Sunday, June 30, 2013

Stock your Freezer with Tamales

I got that nesting urge this morning! Baby Wyatt is on the way, and my freezer needs to be stocked!!
 
 I started by hydrating 2 cups of texturized soy protein (TSP); I spiced it up with chili powder, cumin, smoked salt, pepper, paprika, garlic and cayenne pepper.
 
 I then began to sauté every "must go" veggie in the fridge; onions and peppers mostly, some tomatoes. I added these to my hydrated TSP and then decided to make two dishes from it. After all, how much taco meat does a family need. I made half of it into a chili by simply adding canned beans and crushed tomatoes. I found a Mexican simmer sauce deep in the pantry and added about half of this to it (the other half into the remaining meat mixture). Into the freezer that went, labeled: Veggie Chili- Serve over rice, over nachos, in burritos or add more beans and serve with green onions, sour cream and cheese. I need to be very specific since someone else might be thawing and preparing meals ( Daddy!).
 
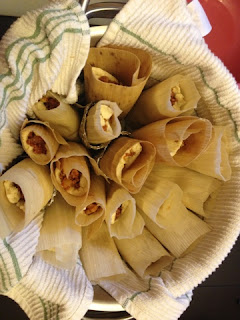
What to do with the other half of the taco meat mixture..? I continued to raid the pantry, then freezer, for other ideas. I found frozen corn husks and masa harina!!! Perfect!! I was going to make tamales, I just happened to have a recipe all written up from the Market District May Newsletter 2011!!!
 
I don't have a recipe for the veggie taco filling I used ( you can see how that would be difficult to document since I started with no plans to make a tamale filling). The filling is the easy part though, and you can really use anything. I have done roasted peppers with a hunk of  jack cheese (rajas con queso). Very easy.
 
This recipe includes how to make pork or chicken filling, and it can certainly be made ahead of time to break up the work.
 
Give it a try!!


Makes: 18 tamalesPrep Time: 1 hourCook Time: 1 hour
 
Ingredients:18 dried corn husks
 
 
Soak and clean corn husks in hot water for at least 30 minutes or until soft; drain and set aside.
 
For the meat filling:
1.5 lbs.  pork roast or chicken breast
1 Tbsp. chili powder
1 Tbsp. cumin
2 Tbsp. brown sugar
1/2 cup finely minced onion
1/2 cup chicken broth, divided
Salt and pepper for seasoning

Olive oil Spray
 
Place pork roast or chicken in a shallow glass baking dish and rub with spices, brown sugar, onion and 1/2 cup of broth; cover with aluminum foil and marinate for 30 minutes in refrigerator.

Preheat oven to 450˚F. Bake pork or chicken covered for 45-50 minutes until temperature is 160˚F for pork/165F for chicken. Remove from oven and let stand 20 minutes. Shred using 2 forks and return to pan with juices to coat
 
For the masa:
4 cups instant corn masa mix or masa harina
1 tsp. Giant Eagle garlic powder
1 tsp. salt
1 tsp. baking powder
1 cup frozen white corn, thawed
3/4 cup canola oil

3 3/4 cups chicken broth
 
Prepare masa while meat is roasting. In a large bowl, mix together masa harina, salt, garlic powder and baking powder. Place corn, oil and 1cup broth in a blender and process until smooth. Stir into masa harina, and mix until a smooth dough is formed, adding remaining broth.

 
Set up a station- Place meat, prepared masa, husks and pot with steamer insert nearby. Add enough water to pot to just reach bottom of insert. Line steamer basket with 1 or 2 kitchen towels if desired, to absorb condensation and prevent sogginess.
 
Working with one softened husk at a time, open to flatten and place a heaping 1/4 cup of masa dough onto center of the husk, about 1/2 inch from the top of the husk. Spread or press dough into a 4×3 inch rectangle using a flat spatula or clean fingers.
Place a heaping tablespoon or two of filling down middle of dough.
Fold one end of the husk over tamale to cover filling, enclosing the filling. 


The masa should wrap around the filling
Tuck the back end of the husk forward, enclosing the tamale.
 Fold over to form a tight and neat rectangle (top of tamale will be open).

Place tamales open side up in the prepared steamer insert. Cover and steam for 55-60 minutes. Let tamales rest at lest 15 minutes before serving. Check water near the end to make sure the pot does not burn/dry out.
  Serve hot with lime wedges and hot sauce. Add other toppings such as salsa, sour cream and chopped cilantro if desired.


Sunday, June 23, 2013

Carrot Date and Millet Protein Bars

Yesterday I realized that I had tons of baby carrots that needed to be eaten; I also realized that eating them plain, would make for a difficult task (even with all the blue cheese dressing in the world). Of course, today I opted to do some baking. I also had some super old, dry dates that needed to be used. They almost got thrown out at our work test kitchen, but I bravely rescued them from date suicide!!!

And why not throw some millet in it too; I have tons, and a nice dietitian from Columbus Ohio has been asking me for some recipes. Try this out Gina!

If you are looking for a gluten free version, try omitting the flour and using some gluten free all purpose baking flour, such as Bob's Red Mill.

This recipe makes 21 small bars, but you can cut them into larger portions (or even smaller). I plan on leaving some out for the week, sharing some and of course freezing some for when baby Wyatt comes to visit (an extended stay)! I know things will be crazy then (is what I hear).

By the way, these are approved by Mr. Little himself! ( mostly because he cant see the carrots or the dates lol).

Carrot Date and Millet Bars

1 ½ cups pitted dates
 2 ½ cups grated/shredded carrots
 2 eggs plus 1 egg white
2 tsp. vanilla extract
 1/3 cup agave nectar
¼ cup olive or canola oil
1 ¼ cups vanilla whey protein powder
1 ¼ cups whole wheat pastry flour
½ cup uncooked millet
2 tsp. baking powder
1 tsp. cinnamon
½ tsp. salt

Place dates in a medium bowl and add about 2 cups hot water. Soak for about 10-15 minutes, as needed until tender, depending on how old they are (mine are OLD!); drain.
Preheat oven to 350˚F. Place carrots and dates in food processor and pulse until finely chopped.
Add eggs, vanilla, agave and oil.
 Process until smooth.
In a large bowl, combine remaining ingredients. Stir in carrot mixture and mix until combined. Lightly coat a 9x13-inch pan with cooking spray. Line pan with parchment, wax or foil for easy clean up ( trust me), leaving a few inches of overhang for easy removal. Spread batter evenly on pan and bake for 35 minutes, until center is set.
Cool slightly in pan. Lift bars, holding  wax or foil paper, and transfer to wire rack. Cool complete before cutting (at least, if you want them to look pretty).


 160 Calories and 8 grams protein


Sunday, June 16, 2013

Whole Wheat Protein Packed Apple Spiced Muffins

 
It's father's day weekend and the hubby/daddy- to-be suggested I make his favorite spice muffins to use up our old apples (instead of the apricot studded morning cake I wanted to make, to use up our old apricots).
 
 I have made several versions of these muffins in past years, and for once I really tried to standardize my recipe. There are a few things I know I want in a muffin- whole wheat and protein powder to make for a more balanced muffin; more fiber, b vitamins and protein to keep us full!. All Chris asks for is a moist and spicy muffin.
 
 It makes a large batch, so make sure to freeze half of them (unless you plan on eating 18 muffins with the next few days) once they cool so that they are fresh and ready to warm on a rainy day. I like to keep a few at room temperature for a couple days and also refrigerate a few for the rest of the week. I think baked goods are best at room temperature, but since they have no added preservatives, they get moldy pretty quickly, especially in the hot summer months.
 
These muffins will be great once Wyatt comes; a quick and easy breakfast or snack that will be ready with just a 15-30 second microwave thaw. My mom is coming to stay with us in August to help take care of our little man, and she will totally love these with her coffee in the morning (and at night!).
 
Here is our favorite apple spiced muffin recipe!

Apple Spiced Muffins with Walnuts makes 18 muffins


 Dry ingredients:2 cups whole wheat pastry flour
1 cup vanilla protein powder
1 Tbsp. baking powder
1 tsp. salt
1 Tbsp. cinnamon
1 tsp. ginger
1/2 tsp. cloves
1 cup sugar or sucanat ( or half sugar, half Xylitol)
2 1/4  cups finely chopped or shredded unpeeled apples(about 3 apples)*
Wet ingredients:
3 eggs
 2 tsp. vanilla extract
1 cup milk
½ cup olive oil
Topping:
1 cup chopped walnuts

*the food processor works great for this!

Preheat oven to 375˚F. Combine dry Ingredients in a large bowl ( fold apples in last to make sure they are fully coated with flour). In a medium bowl, whisk together wet ingredients and fold into dry mixture. Mix until just combined.

Coat 18 muffins cups with cooking spray and fill ¾ full with batter. Sprinkle walnuts evenly over top, pressing them into batter gently so that they stick.

Bake for about 30 minutes, until center is set.

 
GREAT FOR FREEZING!!!

Sunday, June 9, 2013

How to Eat More Veggies and Fruits

In my opinion, in order to eat more fruits and veggies, THEY NEED TO BE IN YOUR FACE!! that is, in your fridge, your pantry, in your house!!
 
Step 1 is to purchase them! This is very helpful! As you all know, I am a Costco shopper, and I buy in pretty large quantities for the best prices! This forces me to eat them...I mean, I don't want them to  spoil! they are so pretty!
 
Step 2 is to do some prep ahead of time. Wash and cut in advance. Either for the week or for the next few days. This takes a little time and planning, but it helps you commit to getting them in to your diet.
Step 3 is to just have fun, and get stuff you like!
 
Step 4 if you don't like many veggies, well no problem, just add them to your smoothies! You don't even have to look at them:) I like to do this as way to increase my intake, after all, little Wyatt Little  needs the best nutrition! I don't LOVE cooked veggies for the most part, at least when you eat them on their own. But I do enjoy veggies in the raw.
 
Step 5-just DO IT!! add them to sandwiches, side dishes, smoothies, have them with dips, chop them super fine (makes it easier to get down as the hubby says), or puree them into recipes (think Deceptively Delicious).
 
Step 6-invest in some cute containers (it helps if the veggies look good in their little containers), preferably glass, and lots of baggies!
 
So here is my prep for the week:)


Here is what I have to work with!! Yup, all mine!!!!
Veggies and dip! This week I have a lemon goddess dip:)
These blueberries are washed and ready to top with yogurt or cottage cheese! of course if you get raspberries or blackberries, they should be eaten within a few days, and washed just before using.
Get ahead of the game , and pack your cottage cheese, yogurts (if you buy the large tubs), almonds, whatever! 

My veggie smoothie packs ( 1/2 bell pepper, 1/3 cucumber, 5 carrots, blueberries or other fruit that keeps well); I just pop 1 in the blender with water and a half scoop of protein powder (handful of berries already in the bag), or add frozen pineapple, and voila-2 servings of veggies at breakfast! I admit to often just prepping the smoothie each night, but that just gets annoying.
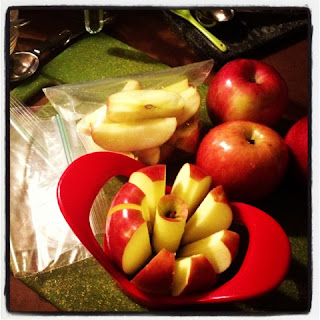
I don't mind if my apples are a bit oxidized, they still taste great! If you do, just toss them in a little lemon juice or carbonated soda like seltzer water.
While you are at it, just prep your snacks for the week too! Eggs=muscle in the bank!