Sunday, April 14, 2013

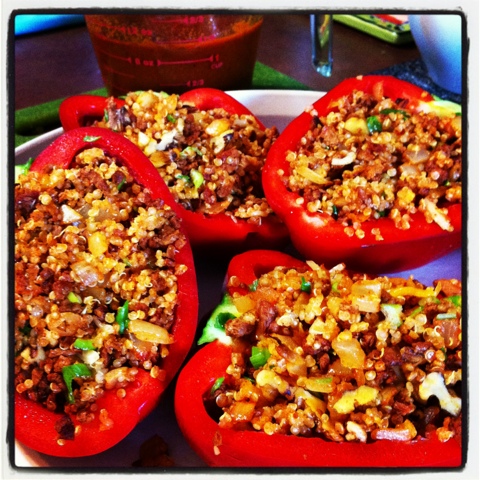
Quinoa and Soy Chorizo Stuffed Peppers

My inspiration for making this dish?-

1. To use up the soy chorizo that has been lounging in my refrigerator for a while; a "must-go" item".
 
2. To make sure we eat veggies with our Sunday dinner  (covered with cheese!).
 
3. To continue to get through the massive amounts of quinoa I have in the pantry.
 
4. The chance to use up some of the homemade salsa roja I have in the freezer.
 
As you can see, this is a meal with purpose!!
 
Quinoa and Soy Chorizo Stuffed Peppers

 ½ white onion, chopped
6 oz. soy chorizo (about ½ package)
1 cup quinoa (1/3 cup uncooked)
¾ cup shredded Mexican blend cheese, divided
¼ cup chopped toasted walnuts or pine nuts
2 tbsp. chopped cilantro, plus more for garnish
Cooking spray
2 bell peppers, halved lengthwise, ribs removed
1¼ cups enchilada sauce, store brought or homemade (or any spicy tomato sauce such as salsa)
2 Tbsp. nonfat Greek yogurt,  plus more for garnish
 
  Makes enough for 4 servings, when accompanied by a dinner salad. We had them with baby kale, lemon vinaigrette, cranberries and avocado (and more walnuts)!! Delish and hubby approved (most hubbies should at least love the stuffed peppers).
Preheat oven to 350˚F. Sauté onion and chorizo in a medium skillet over medium high heat, for about 5-8 minutes, adjusting heat to medium to prevent over caramelizing.
Stir in cooked quinoa, half of the cheese, nuts and cilantro.
Coat a medium baking dish with cooking spray and arrange pepper halves atop.
Stuff each halve with a heaping ½ cup of quinoa filling.
 
In a small bowl, stir together sauce and Greek yogurt. Pour over top of peppers and sprinkle with remaining cheese.
 
 
Coat a piece of foil with cooking spray to prevent cheese from sticking. Cover peppers, sprayed side down and bake for 30 minutes; remove foil and bake for another 10 minutes. Cool slightly before serving. Garnish with a dollop of Greek yogurt and cilantro, as desired.


Sunday, April 7, 2013

Goji Berries-Super Food or Just a Hype??

 
As you may know, I love working with trendy and functional foods. Recently, I have been doing some research on Goji berries (or wolf berries)for an upcoming workshop titled " The FUNtional Foodie: Making Trendy Foods Affordable to Fit my Plate". My colleague and I will be presenting at the Pennsylvania American Dietetic Association Annual Meeting and Expo held in Monroeville.
 
Yup, my big belly and I are kind of nervous, but what could be more fun than talking about fun foods and preparing recipes in front of a bunch of nutrition professionals! Baby Wyatt and I can't wait to be up on stage!
 

Here are some claims made on Goji berries:

People have used Goji berries to treat many common health problems like diabetes, high blood pressure, fever, and age-related eye problems. They have been called the fountain of youth, due to their high antioxidant content.  In some Asian countries, Goji berries have been eaten for generations in the hopes of living longer. Some say they even aid in weight loss by decreasing waist circumference.
 
Some studies using Goji berry juice found benefits in mental wellness and athletic performance, quality of sleep, and overall good health. .


Here are the facts:

 
Goji berries can be eaten raw, cooked, or dried  and are used in herbal teas, juices and wines.
They are bright orange-red berries that comes from a shrub native to China.

In general , research shows that eating berries, such as blueberries, cranberries and  strawberries offers some health benefits. Berries, such as Goji,  are packed with antioxidants and other compounds that may help prevent cancer and other illnesses. It is well known that antioxidants may also boost the immune system.

Eating foods high in antioxidants minimizes damage from free radicals that injure cells and damage DNA. By doing so, antioxidants may  help reduce the risk of some serious diseases.

Goji berries also contain vitamin A, which aids in  protecting vision.

In two separate RCT in animal models, the berry juice was been shown to increase metabolic rate, reduce body weight  and produce general feeling of well being by increasing energy levels (Amagase et al.).
In another study in mice, supplementation of the berry polysaccharides was shown to protect against exercise induced oxidant stress (Changbo et at.)

In another animal study, the berry extract improved neurological deficits and cerebral edema in mice with ischemic stroke (Yang et al).

In a Chinese review study, experiments have shown that the polysaccharides components are the major contributor to the biological activities in the berries (Jin et al.).

Some research suggests that Goji berries may boost brain health and may protect against age-related diseases such as Alzheimer's. More research is needed.

While Goji berries are a rich source of antioxidants, and research may be promising for health benefits, it is unclear whether they are any more nutritious than compared to other berries. Also, it is unclear which variety( the raw, dried or supplement) are the most effective.

Try this new and fun recipe- to be used in the food demonstration component of our workshop:

Goji Berry Chocolate Truffles


 ¾ cup roughly chopped or sliced almonds
1/3 cup dark chocolate chips
¼ cup dark cocoa powder
1 cup dried goji berries
1 cup apricots (or golden raisins, cranberries, cherries)
2 Tbsp. agave syrup (or honey)
½ cup unsweetened coconut for rolling (another trendy food!!)


I purchased these on Amazon!

Place ingredients in a food processor (except for agave and coconut) and process until finely ground.

 Add agave and pulse until thick dough forms.

Use a tablespoon or small cookie dough scoop to shape mixture into truffles. Coat scoop with cooking spray to prevent sticking.


 Roll in coconut and store in an airtight container.

Makes 30 small truffles.


If you are interested in the nutrition facts, contact me at chef.jacqueline@yahoo.com

Sunday, March 24, 2013

Easy Homemade Bread

Leslie Mcilroy, a fabulous colleague of mine, is a copywriter and poet extraordinaire!  Check her out at http://www.lamcilroy.com/.
She was kind enough to share her fabulous recipe with me and of course, I had to try it out as soon as possible. Yum!
 
For those of you who are intimated by making fresh bread from scratch, give this a try; you won't be disappointed.
Of course I added some Dietitian fiber boosting options, for those of you who crave nutrient density in everything you eat:). (I know, it's a curse, but just embrace it!)

Leslie’s Easy Homemade Bread


Makes 2-3 loaves, depending on size
 
3 cups lukewarm water
1 ½ Tbsp. yeast (2 pkgs.)
1 Tbsp. salt
6 ½ cups bread flour such as King Arthur

Dietitian Fiber boost add-ins*:
1/3 cup millet
1/3 cup cornmeal
½ cup oats
1/3 cup wheat germ
1/3 cup flaxseed meal
½ cup additional water, as needed

*I added in all of these, but you can mix and match what you have and want, up to a total about  2 cups. I also used ½ bread flour and ½ white whole wheat flour.

Place water, yeast and salt in a large bowl; stir or whisk to dissolve yeast.
Add flour (plus any extra fiber boosters).I love millet! It adds a yummy crunch.  Mix until well combined (adding the additional water depending on how much extras you added).
The mixing may take a little arm strength to get the dough well combined.Feel free to use a stand mixer, but the point of this recipe is to make it easy, or why not just go old school and work a little. If you are a fan of "kneading", then please do so! Kneading the dough for about 5-10 minutes increases gluten, which adds elasticity to the bread. This will result is a puffier, chewier bread.
Cover with a plastic bag (or plastic wrap coated with cooking spray) and place in a warm area such as on top of the warm oven. Refrigerate for 2 hours or up to two weeks (it gets more like sourdough the longer it is in the fridge).
I was not able to wait 2 entire hours...so at 1 hour of rising, I shaped the entire batch into 3 loaves!
 
Preheat oven to 425 F. Take 1/3 or ½ dough( or make several loaves like I did) , using a little flour as needed, and form loosely into a loaf ; place on a greased pan . Cover with plastic wrap and let rise for 45 minutes at room temperature.
Because I love it when my food looks pretty, I brushed the tops lightly with egg wash (beaten egg with a splash of water) and then sprinkled on some chopped chives, chia seeds and oat bran! I also scored the tops with a small paring knife for that artisan bread look.
Bake for about 30 minutes until golden browned and bottoms feel hollow when tapped. I baked the loaf about 10 minutes longer since it is deeper and turned to oven to 350F. The smaller loaf was done at 25 minutes, so keep an eye out if you are making multiple sizes. The bread recipe came at a perfect time for me; I gave one away at a dinner party that evening, the other is for a little get together tomorrow night (with Greek yogurt spinach dip), and the last loaf is for my week's lunches!


Sunday, March 17, 2013

Tuscan Kale Salad with Cherries, Feta and Pine Nuts

 
Last week my colleague and I visited the Market District central kitchen in the South Hills to have a better understanding of their processes. We had the chance to sample some tasty foods, including a delicious kale salad with ricotta salata cheese.  I have thinking about this salad since then, craving the crisp and delicate kale combined with the salty briny cheese and sweet fruit…yum!!
Here is my version; I added a little red onion, used feta cheese and whipped up vinaigrette with honey that I think matches the one used at the stores pretty nicely. To note, I do have the recipe stashed away at my desk at work, since I am running nutrition facts on it. I thought it would be way more fun to create my own version!
What’s so special about Tuscan Kale you ask? Tuscan kale is also known as dinosaur kale or palm tree kale, and it tastes better and is more resilient than its regular counterpart. It is amazingly nutritious, as it is packed with vitamin C and K. Since it is part of the cabbage family, some studies have linked its sulfur compounds to a decreased risk of cancer.
 Tuscan Kale Salad with Cherries, Feta and Pine Nuts
1 bunch Tuscan kale (about 12 cups chopped)
1 cup tart dried cherries
1/3 cup pine nuts, toasted
4 oz. crumbled feta cheese
1/3 cup finely diced red onion, optional

For the dressing
3 Tbsp. honey
2 Tbsp. seasoned rice wine vinegar
¼ tsp. salt
¼ tsp. pepper
3 Tbsp. olive oil
 
Clean kale by submerging in a large bowl of cool water; lift up and out of water, leaving behind any dirt. Place in colander and pat dry with a clean towel.

Gently bend each kale leaf in half and remove center rib with fingers; tear off gently.
 
 
Soak cherries, if desired, in 2 cups of hot water for about 10 minutes to soften.
Combine together ingredients for dressing in medium bowl, whisking in oil as the last step.
Toss ingredients together in a large bowl and chill until ready to serve.
 
Chris and I shared this for a nice light dinner! And you know what, he loved it!!!


Sunday, March 10, 2013

Gluten Free Dairy Free Fresh Fruit Tart

I made some pretty awesome tarts (I must say) for a dear friend and co worker. She was recently transferred to a different department after 13 years of great work in the sensory lab; we miss her so much but she is right down the hall and we still get to see her. Of course, as a dietitian and chef, I love to accommodate dietary restrictions and food intolerances!

Here is the recipe, a combination of many ideas I saw online. I actually made two tarts in order to share with both her new department (our great friends in the cafe!) and ours. This recipe doubles easily, making once batch of dough at a time though (due to space in the food processor).

Fresh Fruit Tart with Almond Crust and Tofu Filling 

For the Crust:1 cup gluten free all purpose baking flour
1 cup almond flour
 ½ tsp. cinnamon
Pinch of salt
6 Tbsp. coconut oil
¼ cup agave nectar

For the Filling:8 oz. container Tofutti® plain Better Than Cream Cheese
¼ cup agave nectar
1 tsp. vanilla
5-6 large strawberries, sliced
1-2 kiwis, peeled and sliced
1 cup black berries or blueberries
½ cup mandarin oranges, packed in juice, drained and patted dry
For the Glaze:¼ cup apricot preserves
1 Tbsp. water


Combine both the all purpose flour and the almond flour in a food processor. Add salt, cinnamon and  coconut oil (or half butter).


Pulse until crumbly; add in agave and pulse until dough  forms. Wrap tighly in plactic wrap and chill in refrigerator for about 1 hour. 


Preheat oven to 350F. Once chilled, roll out dough using 2 pieces of plastic wrap to prevent sticking. Roll a little larger than 9-10 inch crust, about 1/4-1/2 inch thick.
Carefully peel off top piece of plastic and use other piece of plastic to help transfer dough onto tart pan, inverting dough so that the plastic faces up. carefully press into pan and peel off plastic. Any torn pieces can just be pressed into crust (it will all just bake up together).
Coat crust with cooking spray and top with a piece of foil. Use pie weight or dry beans to help hold crust in shape. Pour over foil covered crust. I used a mixed bean soup that was in my pantry for way too long. Rice works too. You can save the rice or beans in a container once cool and make them your dedicated "pie weights":). Bake for 15-18 mintues until crust crisps like a cookie. Crust will harden a bit more as it cools. Crusts can be made a day ahead of time. This is what I did.
Tofutti Brand Plain Better Than Cheese Cream 8 Ounce
Here is the stuff I used for the filling. There are other brands out there, but this one tastes the best. Find it in the organic/specialty dairy section. Or try making your using silken tofu. Combine ingredients for filling a medium bowl and mix well until smooth. Add any additional flavoring you wish...just as a tablesppon of rum.

Spread mixture over crust. I prepared my tarts on the day they were going to be eaten. The crust will get soggy if they are made too far in advance.

I used star fruit as my first layer, but you can use kiwi if you would like.
Decorate tart as desired, using any combination of fruits you would like.
Here is how my first tart turned out. Once built. Place ingredients for glaze in  microwave safe bowl and heat until melted. Puree mixture if needed to smooth out. Use a pastry brush to gently brush mixture over fruit.
Voila! Here they are right before surprising Carina!!! Even the non gluten free non dairy free peeps enjoyed this! As for Nutrition facts...well...sorrry folks...ran out of time...baby's comin!!!

Sunday, March 3, 2013

Blueberry Lime Chia Jam

Chia seeds, a super trendy functional food, are not only amazing but also easy to use. They highly nutritious, and also have awesome gelling and water absorbing capabilites due to their soluble and insoluble fiber content. They are wonderful for making puddings and even can serve as a substitute for eggs in some recipes. Try them sprinkled on salads, in smoothies, on cereal, yogurt, or as a garnish on baked fish or chicken.

1 tablespoon contains about 70 calories, 6 grams fiber, 3 grams protein and 2.9 grams omega-3 fatty acids. It is often considered the richest plant based source of fiber, protein and essetial fatty acids.

Go ahead, try them in this quick and easy jam!

Blueberry Lime Chia Jam
2 cups fresh blueberries
3 Tbsp. agave nectar or honey
Zest and Juice of 1 lime
3 Tbsp. chia seeds

Bring blueberries, agave, lime zest and juice to a boil. Simmer for about 5-8 minutes until tender and syrupy.
Use a potato masher to smash berries to desired consistensy (do this part while mixture is simmering).
Stir in chia seeds and remove from heat. Let sit for about 30 minutes to cool.
Mixture will thicken as it cools. Tranfer to a container and refrigerate until chilled, about 2 hours.
Serve as desired-it is wonderful on pretty much everything!!

Sunday, February 24, 2013

Chia Coated Quinoa Bites

I got a wonderful recipe from my mentee/coworker/buddy Allison for Quinoa Protein Bars! They did start as protein bars, but then I decided to make them into little truffle bites, coated in chia seeds (I have tons to use up!!). The recipe is awesome, so of course I decided to make a double batch (in hopes to use up more of my quinoa stash) ! I should have stuck with a single batch of this because things got pretty messy! I recommend just sticking to a single batch:) I ended up using flaxseed meal to help bind the sticky stuff together a bit more.

I also made about 80 little bites; baby Wyatt (in my belly) will be quite pleased with the extra snacks!


Here is the original picture from skinnyms.com


Protein bars Quinoa Protein Bars
Ingredients
  • 1/3 cup quinoa, pre-rinsed
  • 2/3 cup water
  • 16 whole (pitted) dates, no sugar added
  • 1/2 cup raw almonds with skin
  • 1/3 cup natural crunchy peanut butter (almond butter is an option)
  • 1/4 cup dark chocolate chips (I used about 1/2 cup chia seeds here)
  • 1 tablespoon honey (optional) (I also used flaxseed meal for rolling)
Directions
Add quinoa and water to a small sauce, cover and bring to a boil, reduce heat to a simmer and cook approximately 15 minutes or until all water has been absorbed. Cool to room temperature and refrigerate at least 2 hours ( I only waited about 30 minutes) ...overnight will work.

This is where it got super messy trying to make a double batch!

Using a food processor, add dates and pulse until they form a ball. Remove dates and place in a medium mixing bowl. Add almonds to the food processor and pulse until finely minced. Be careful not to turn the almonds into mill. Add dates, almonds, peanut butter and cold quinoa to the food processor and pulse until ingredients are well combined. Return ingredients to the mixing bowl, shape into 6 - 2" x 1" bars, about 1" thickness. Place on a dish, refrigerate until chocolate is set.

I opted not to do this part and coat them in chia and flaxseed instead!

In a small saucepan, add chocolate chips and honey...melt over low heat or in a double-boiler. Evenly spread chocolate over the top of each protein bar, return to the refrigerator and allow chocolate to harden. Bars can be stored in an airtight container for several days.


I left my almonds a little chunky for the extra crunch:)

Too many dates in the food processor!!

Fiber and protein packed little treats.


I got the hubby to help me with these; he suggested we freeze some and eat them ice cold. Great idea!


And...they get their photo shoot!


Looking sexy!!